Residential Moisture Investigations: Key Concepts and Essential Tools
One of the most challenging aspects of a moisture investigation is determining the source of the problem. Recurring moisture issues are frustrating. Mysterious spots, stains and mold are unsettling. With some building science fundamentals and the right tools and training, your moisture investigation skills will get to the bottom of most moisture mysteries.

Three Main Causes of Moisture Problems
Moisture problems in buildings have three main causes, from Mother Nature and from manmade causes:
1. Building Envelope. This includes roofs, windows, doors, flashings, waterproofing, grading. Problems with the building envelope are caused when the waterproofing is improperly installed and where water leaks directly inside from the outside due to breaches like cracks, holes or gaps in the building.

No proper kickout flashing at the roof-chimney edge.
2. Plumbing Leaks. This includes plumbing supply and drain lines. Slab leaks are often a common source of leakage, especially in Western states; however, supply line leakage can occur anywhere, along with drain line leaks above and below grade, all of which can be very costly to fix.

Plumbing supply leak. Excessive corrosion and an active leak. Loose and missing insulation indicates that this may have been a known condition in the past.
3. Thermal Envelope. Problems with the thermal envelope are characterized by moisture that forms on the building surfaces where warm, moist air meets cool surfaces. At the dew point, moisture forms and then the water drips into the building. This can happen on the surfaces of air conditioning equipment, outside walls, and even inside walls and ceilings as a result of air in-leakage or thermal bridging from misplaced, incomplete or missing insulation, improper ventilation and design flaws.

Condensation showing drips at ceiling caused from high humidity, lack of ventilation. The humidity level inside was higher than outside.
Understanding Water
Water flows in the path of least resistance. The “path of least resistance” describes the physical or metaphorical pathway that provides the least resistance to forward motion. The concept often is used to describe why an object or entity takes a given path. Water will find the path that takes the least effort and does not adjust for how long it will travel.

Evaporation is a critical process for infrared technology to be effective. The vaporization of a liquid to a gas reduces the temperature of the liquid, resulting in evaporative cooling. It is this difference in temperature that the infrared camera detects.

Water retains heat. Water is very resistant to changes in temperature. Wet materials retain energy differently from dry materials. This is why wet areas may be warmer than dry areas at certain times. Water-soaked materials can hold heat longer than many other building materials that are less dense.

Tools in Your Bag
The primary tool in your bag is your knowledge. However, just as quality training is essential to attain knowledge, it is also wise for home inspectors to consult with an expert to make sure you have the right tools for a given application. Tools used in moisture investigations call for specific features to get the job done right.

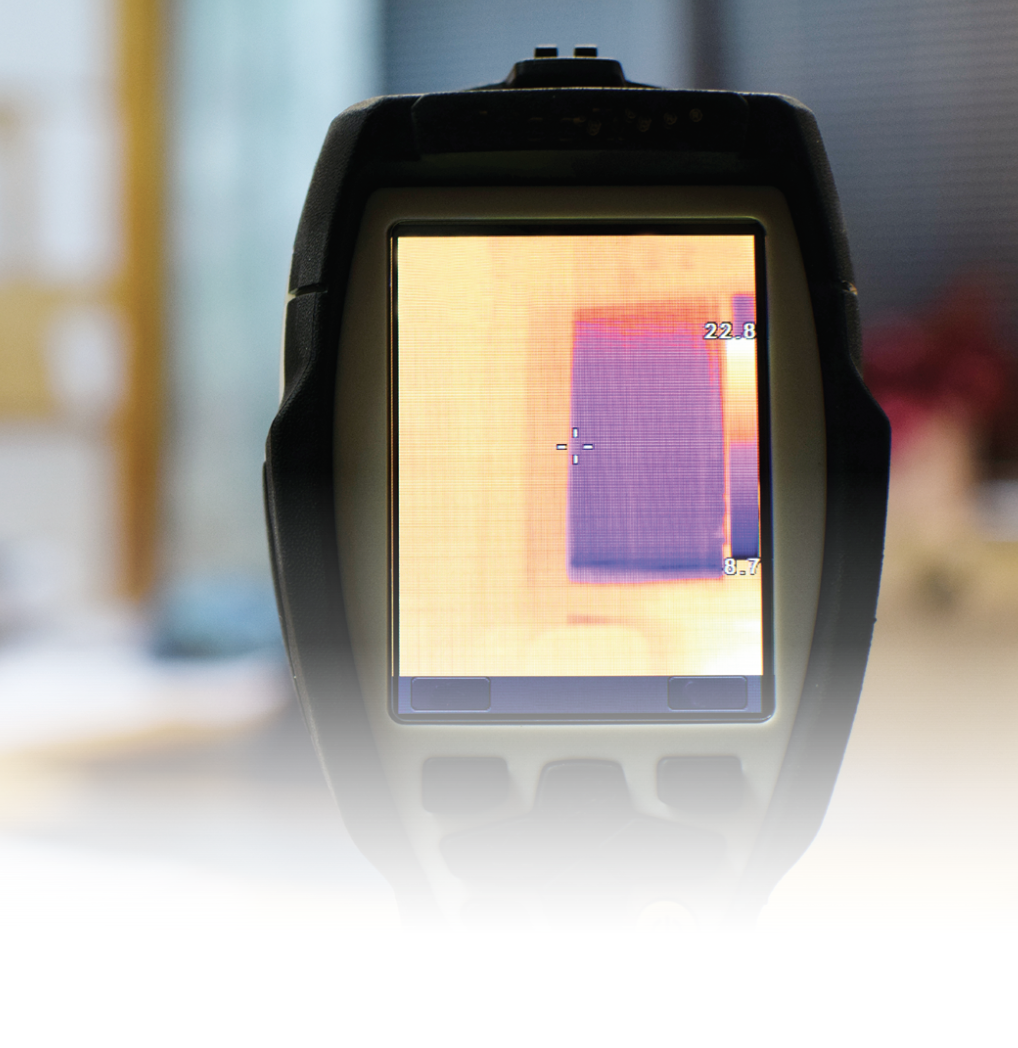
Infrared camera. The improvements in infrared sensor technology have made most thermal imaging cameras effective and affordable to the moisture investigator. Many entry-level infrared cameras perform quite well when used for moisture mapping. However, even the best infrared camera may be useless without the user knowing how to interpret the images on the screen. Unfortunately, some inspectors unwittingly buy an infrared camera that does not meet the needs of their application, environment or both. It is important that the specifications of the infrared detector match the intended application.
The three main detector specifications are as follows:
- Type and wavelength: Is the detector cooled or uncooled? What type of detector materials? What wavelength will be required?
- Thermal sensitivity: Is the detector sensitive enough to see slight differences in temperature that is sometimes needed? In situations in which environmental conditions don’t have large temperature differentials, such as in temperate climates, the resolution and sensitivity are more important for accurate interpretation of images.
- Spatial resolution: Does the detector have enough pixels to produce the image I need? How much signal degradation will I get from using a wider or longer lens?
Moisture meters. As impressive as infrared cameras are, there are limitations to their capacity. Moisture meters are used to validate anomalies found in infrared images. Images that appear to be moisture can only be verified with a reliable moisture meter. Proper usage and adherence to standards are necessary for accurate reporting.
Hygrometer. Hygrometers are used to identify relative humidity (that is, moisture) in the air. Comparing relative humidity in different environmental areas of a building helps identify sources of moisture.
Additional items. A level, tape measure, blue tape, plastics, masking materials, spray nozzles for water testing, ladder, white duct tape are all items that could be needed.
Training
You don’t need expertise when the source of a leak is obvious. Expertise is needed when moisture problems are not obvious. For example, inspectors often find stains from a past leak. Frequently, the client wants to know if it’s still wet or not. If it’s found to be dry, it doesn’t necessarily mean there is not a problem.
Water can take three to five days to dry out in most building materials. So, if the source of water has not been present recently, such as with a lack of rain, then the stain may have dried. Moisture detection in this situation may be challenging, but with qualified training, it is not impossible.
Here is a tip for when you find a stain: If the sellers or the association cannot produce documentation of a repair, consider the stain to be a current problem.
Many inspectors look into getting Level 1 infrared training. Level 1 training will teach you the physics and understanding of infrared theory. You may learn about some applications, but the focus is academic. If you would like to expand your business into moisture detection, consider getting advanced application training such as taking a moisture inspection course.
Case Studies
There are vast opportunities for moisture detection and countless scenarios of moisture issues. In this section, I will pose a diverse cross-section of cases to broaden your understanding of how you can add moisture detection to your expanding range of knowledge.
CLIENT A: FINDING THE SOURCE OF AN ACTIVE LEAK
Client A was advised by the city that an active leak was present in his plumbing system; this was based on meter readings. Repeated attempts to locate the leak were unsuccessful, so Client A called me to conduct an infrared inspection.

The main water shut-off was found to have an active leak at the gate valve (shut-off). The handle was turned to an off position to help further isolate the condition, at which time the valve was found to be leaking excessively. The infrared photo on the left clearly shows the water leakage in the shut-off area. The dark areas are indicative of active water.
Our survey confirmed that there was active leakage in the crawl space and at the main water shut-off. We recommended reviewing the water meter after repairs were made to determine if additional leaks may exist.
CLIENT B: SOLVING A MYSTERIOUS ROOF LEAK
Even after Client B made numerous roof repairs, he continued to have leaks occur in his house during rain.

We performed an uncalibrated water test over a series of areas on the roof. Initially, water testing was started at the roof for 10 minutes, but no leakage was noted. The water then was elevated to a stucco wall. Within seven minutes, we noted leakage at the inside. It appeared that, based on water testing, the failure was a result of sidewall or counter flashing.

The before and after images (Page11) show the water leakage during the sidewall testing. The testing was stopped after multiple water testing sequences.
The primary source of leakage was the sidewall and the counter flashings at the wall. The water testing we performed was below the window, relating to the building envelope weather seal, or the sidewall or counter flashing.
CLIENT C: PLUMBING OR WATERPROOFING?
Water entry at the garage called for an infrared inspection and a pipe inspection to identify the source of water.

We found active water flowing at the garage walls, along with damage indicative of failed waterproofing. By using thermal imaging, we observed anomalies indicative of active moisture (that is, the darker areas), which was likely due to excessive water at the exterior of the foundation.

A sump pump was present and we found it to be continuously operating. The drain at the upper planter above the garage area and opposite to where the water entry was occurring cycled with the water that was overflowing at the drain. It was apparent that the sump pump was discharging water into the exterior drainage and the exterior drain line appeared clogged.

By using an inspection camera, we confirmed that the upper planter drain was fully clogged. The sump pump discharged into the exterior drainage, which was clogged. This overflowed into a planter, which had become fully saturated and had found voids in the waterproofing, which overflowed to the garage and drainage system, leading back to sump.
This recycling of water was the cause of the sump pump’s continuous operation. A temporary sump pump was installed to discharge water to the street until repairs could be made.
CLIENT D: IMPROPER DESIGN WREAKS HAVOC
For Client D, poor exterior drainage and improper grading, along with inadequate ventilation, led to several areas of moisture and damage at the exterior and in the crawl space of the home.

The vegetation and soil were sloped toward the home. Sloping such as this can promote moisture intrusion and is not recommended. We also noted evidence of sprinklers that were over-spraying at the structure.

The crawl space ventilation appeared to be minimal, based on us viewing only the crawl space access points and several of these 4-inch vents at various areas. We removed a cover to inspect the area and found insulation against the opening, which significantly reduced it fulfilling its purpose.

We found efflorescence at several areas of the foundation. Efflorescence is a mineral salt that remains after moisture evaporates and often is an indication of poor drainage at the exterior.

We found mineral deposits at the soil, and we noted excessive rusting and damage at the metal fasteners. All of this contributed to and was indicative of poor ventilation and previous buildup of moisture at the soil.
The significant damage in the crawl space and the structure appeared to be the result of poor exterior water management.
CLIENT E: MOISTURE AT THE LIVING ROOM CEILING AND MORE
Client E’s home had undergone several repairs due to sprinkler leaks; however, the root cause of the moisture at the living room ceiling was unknown other than being due to recent rains.
We noted active dripping from the ceiling. Also, by using thermal imaging, we identified clear patterns of moisture.

We opened up the wood ceiling to further expose the fire sprinkler line. The wood was wet during removal.
We ran a visual scope camera through the ceiling to the fire sprinkler line, where we found an active leak dripping from a pipe.

We suspected a secondary moisture location at the living room because the thermal pattern suggested active moisture. We reviewed the areas with a moisture meter and found that the area indeed had elevated moisture.

Further investigation behind the wall revealed an exterior HVAC closet. The masonry tile was moist, with evidence of moisture entry that likely occurred during a rain event. We noted a small hole in the wall near the condensate pump. At the exterior, we saw evidence of the source and we focused our attention on the pan flashing in the area.

A close review of the pan flashing at the door area showed an opening where water could clearly enter. Due to the open louvers and the possibility for wind-driven rain, we understood how water entry could have occurred in this location and we noted that there was a gap present in the pan flashing. We surmised that these situations could allow for moisture entry to the wall.
Our survey confirmed there was an active leak in the fire sprinkler pipe at the ceiling and we found evidence of a gap in the pan flashing where moisture could occur at the exterior mechanical closet.
CLIENT F: PERSISTENT ROOF LEAK AFTER REPAIRS
We found evidence of a leak at Client F’s ceiling and wall. Even after Client F had repairs completed at the roof area, the leak persisted.

Our thermal imaging showed anomalies in the wall; however, we tested the area with a moisture meter and found it to be dry. Since the dark areas were dry, they were likely due to insulation gaps. The visual image on the right shows staining at the wall.

There was buildup of debris at the gutter on the roof. Some of the gutter sections had gaps that could allow for moisture entry and some of the cap flashing showed separations that could also allow for moisture entry.

Some of the gutter sections were completely clogged and holding water.

We noted gaps in the stucco and at the cap flashing area. If the water entered at this location, it could result in water entry at the area of concern.
Several areas of concern could have been a source cause of moisture. Of primary concern was the gutter, which was 100% clogged. We noted that, after recent heavy rains, the gutter likely overflowed and allowed for water entry at the gaps in the flashings.
CLIENT G: GARAGE MOISTURE INVESTIGATION
When Client G identified moisture in two residential garages, he retained our services to help identify the cause. We noted that moisture was coming out from under the passage door area in the first garage. This appeared to have been caused by an item in the kitchen (possibly the ice maker) or the bathroom or, possibly, by an outdoor wall fountain between the two garages.

Our thermal imaging identified anomalies (that is, the darker areas) that indicated active moisture in the garages. Moisture meter testing confirmed elevated moisture.

We noted that a hole had been made in the floor area below the threshold a few days earlier. It appeared that the epoxy floor of the garage acted as a barrier and the concrete underneath absorbed the water. The opening made at the threshold area created an exit path for moisture.
The source cause of the moisture appeared to be the fountain located near the garages and we suspected that the moisture intrusion originated at a flashing at the wall to the side of the fountain. The condition appeared to be consistent between the garages. The reason for the moisture intrusion at the area below the garage passage door threshold was due to the water finding the “path of least resistance.” The moisture appeared to be trapped at the garage slab, due to epoxy flooring, and the opening then created a path for the moisture to egress.
CLIENT H: MOISTURE OR INSULATION?
These thermal images below of Client H’s home could indicate either a moisture problem or missing insulation (which would also cause a temperature differential). You would need to use a moisture meter to know which one for certain.

It all goes back to training!
Home inspectors who have some moisture investigation skills can at least begin to get to the cause of most moisture mysteries. If you are interested in having application training, as an individual or for a group of inspectors in your area, contact United Infrared at 888-722-6447 for more information. We can recommend specific courses for the proper application of moisture tools and infrared cameras. Reasonably priced individual and group-based training classes are available.

Peter Hopkins has operated a successful home inspection company since 1996 (www.inspecdoc.com) and has personally performed more than 7,000 property inspections. The company expanded into infrared in 2005 with the opening of SoCal Infrared (www.socalinfrared.com), and Peter found success in many areas of diversification, but more specifically in the ability to diagnose moisture conditions and energy problems that were identified during property inspections. He is the co-founder of United Infrared (www.UnitedInfrared.com), a national network of contract thermographers that includes application-specific training and business coaching in a multitude of applications related to infrared technology. Peter is a Level III Certified Thermographer, ICC Code Certified Building Inspector, Certified HERS Energy Rater, SewerScan Inspector, Equine Thermography trained and is licensed with the California Horse Racing Board as an Assistant to Veterinarian. Contact Peter at peter@unitedinfrared.com.
The author thanks Maureen Del Zio, Office Manager, United Infrared, Inc., for her help with this article. Contact Maureen at maureen@unitedinfrared.com.
To Read the Full Article
ASHI offers its members unparalleled resources to advance their careers. ASHI offers training for inspectors at all levels of knowledge and experience, including resources about all major home systems. Members benefit from a vast network of experienced professionals, providing a community for mentorship and knowledge sharing..
In this Issue

FIND A HOME
INSPECTOR
Professional Networking
Grow your professional network, find a mentor, network with the best, and best part of the community that’s making home inspection better every day.
