Bathroom Remodeling
Once again, The Word invites you to travel into the dark realm of subjects that sometimes are misunderstood by home inspectors. The Word hopes you will find this trip informative and maybe a little entertaining.
This month, we continue our remodeling series with bathroom remodeling. The Word finds this subject interesting because remodeling provides so many of the creative deficiencies that we find every day during our inspections and because by the time this is published, The Word probably will be remodeling bathrooms in his recently purchased home.
Remember, when reading all The Word columns, we’re discussing general principles. Something you see in the field isn’t always wrong just because it doesn’t comply with a general principle. Local building codes and their interpretations, manufacturer’s instructions and engineered designs trump general principles.
New standards, old homes – a brief review
Last month, we discussed some general guidelines about when it may be appropriate to apply new standards to old homes. Let’s review. One usually does not need to upgrade existing work to current standards if the existing work is legal and safe. Legal work complied with standards and manufacturer’s instructions, if any, when the work was done. New work and additions to, extensions of, replacements of and major repairs to existing work should comply with standards and manufacturer’s instructions in effect when the work was performed.
Bathroom remodeling electrical issues
Adding a sink is a common part of a bathroom remodel. Each sink basin should be served by a receptacle, so a GFCI-protected receptacle should be added when a sink is added unless the existing receptacle(s) will properly serve both sinks. The receptacle should be within 36 inches from the basin’s edge. The receptacle may be located on the wall or on the cabinet; but it shouldn’t be more than 12 inches below the counter top. These locations are so people don’t have to run extension cords to serve their bathroom appliances.
A common practice in older homes was to have a receptacle in a light fixture. That might work in a remodel if the receptacle is grounded and on a GFCI-protected circuit; however, required receptacles may not be more than 66 inches above the floor. A light fixture at that height would be a safety hazard, so receptacles in light fixtures are impractical at best.
Remember to check that the receptacles do not move, especially those mounted in mirrors. Receptacles that move may cause loose connections that may arc and cause a fire.
Speaking of receptacles (and switches, too), it should go without saying that they shouldn’t be located on the walls or ceilings above a tub or shower; but occasionally people don’t get the memo. It doesn’t matter how high the receptacle or switch is mounted or whether they are GFCI-protected, they shouldn’t be above a tub or a shower. The Word extends this to plug-and-cord appliances (such as televisions) mounted above tubs and showers on the theory that if the appliance falls, bad things might happen. The client always is free to ignore this warning.
People love to install ceiling (paddle) fans and chandeliers in bathrooms. That’s fine so long as they aren’t too close to a tub or a shower. No part of a hanging light fixture or a ceiling fan may be within 3 feet horizontally and 8 feet vertically from the tub deck or shower pan. See Figure 1. No part includes nonconductive parts such as wood fan blades, as well as potentially conductive parts such as pull chains.
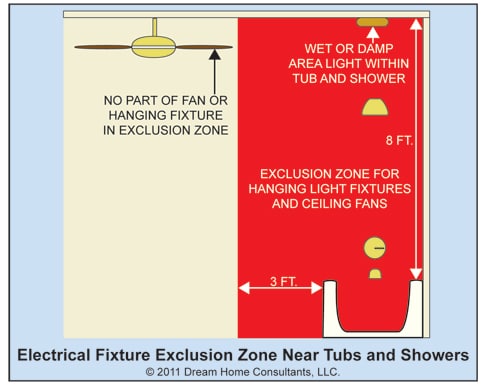
Light fixtures less than 8 feet directly above a tub or a shower should at least be listed for use in damp areas and should be listed for wet areas if they are subject to contact with liquid water. It’s hard to tell how a light fixture is listed without some dismantling. Use good judgment before making a big deal about this issue.
People rarely use them, but whirlpool tubs sure look good and people add them to bathrooms. The pump motor should be served by a dedicated GFCI-protected circuit, often 20 amps. If a receptacle that is only accessible from the service access serves the motor, the receptacle should face the opening and should be located within 12 inches of the opening. This is a new requirement, so many older homes won’t comply.
A whirlpool tub motor with a bonding lug should be bonded to metal water supply pipes using at least #8 copper wire. This is in addition to any equipment grounding wire connected inside the motor. That said, there is usually little practical safety benefit from this bonding connection because most whirlpool tub pumps have no metal in contact with the water. Use good judgment before making a big deal about this issue.
And while we’re on the subject of whirlpool tubs, let’s make sure someone really can get to the tub motor for service and replacement. The opening should provide useful access to the tub motor, so it shouldn’t be obstructed by framing or by other obstructions that limit motor access. The access opening should be at least 12 by 12 inches and, if the motor is more than two feet from the opening, the opening should be at least 18 by 18 inches.
Bathroom remodeling plumbing issues
Where to begin? There are so many issues to choose from.
Let’s start with flexible tailpieces, which also get installed as trap arms and even traps. See Photo 1 (one of The Word’s favorites for creative plumbing). This flexible material is not allowed. All drainage pipes and fittings should be smooth-wall material with no ridges, ledges or bends that will slow down or stop flow. This flexible stuff is unsanitary and has a greater tendency to clog. Here’s another case of just because you can buy it at your local big-box store doesn’t mean you should.
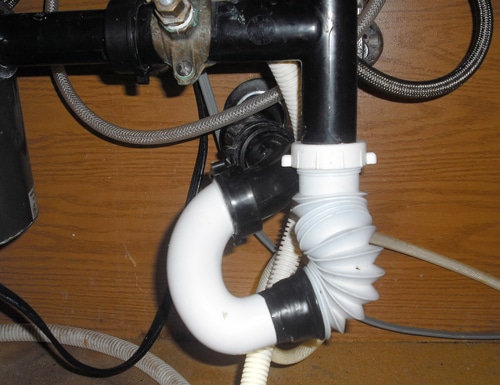
Photo 1: Leave flexible DWV pipe on the shelf at your local big-box.
It’s OK to drain a new sink into the existing trap, but there are limits. We discussed these limits a few months ago; but it’s a common problem, so a little repetition shouldn’t hurt. The distance between a plumbing fixture outlet and the trap should not be more than 30 inches horizontally.
What about adding a bathroom in a basement? You should see a backwater valve if any fixture flood rim and the building drain are below the nearest upstream sewer manhole cover. See Figure 2. A backwater valve is a one-way valve that lets the fixtures discharge into the building drain, but prevents backflow from a clogged sewer from entering the home. The backwater valve should be accessible and have a watertight cover. Look for backwater valves. It’s easy to overlook something that’s not there.
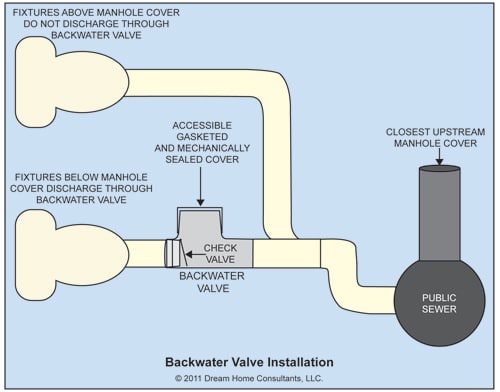
Figure 2
An ejector will be necessary if the building drain is above the basement fixtures. See Photo 2. Only those fixtures below the building drain should drain into the ejector. A full-open valve and a check valve should be installed near the ejector on the discharge side. The ejector should have a gas and watertight seal and should be accessible. The ejector should be vented either to an external vent or, where permitted, by an air admittance valve.
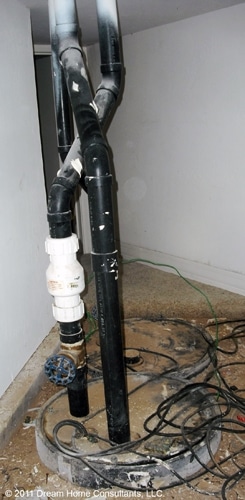
Photo 2: Sewage ejector with gate valve, check valve and a vent.
If you can see where the ejector drain pipe connects with the building drain or a branch drain, make sure the connection is made with a drainage fitting such as a wye, tee-wye or a long-turn 90° elbow. All fittings should enter the drain pipe above the drain pipe’s center line.
The Word likes to run fixtures that drain into an ejector and listen for the pump to activate. There’s not much more we can do to test an ejector.
You might want to advise your client about a couple of practical issues surrounding ejector pumps. A high-water alarm with a battery backup, while not required, is a good idea for all ejector and sump pumps. These inexpensive devices sound an alarm when the water level in the pit reaches a certain predetermined level to help avoid gross stuff spilling all over the place. Ejector pumps won’t work when the power is out, so you might want to warn your client not to use the fixtures that drain into the ejector until power returns.
Bathroom space issues
Sometimes, people try to squeeze bathrooms into smaller spaces than they should. This can lead to some pretty tight clearances between bathroom fixtures and obstructions. Tight clearances are both a convenience issue and a safety hazard. We don’t want people bumping their heads or tripping and falling in wet bathrooms. The elderly and people with impaired mobility are most at risk when there is inadequate clearance at bathroom fixtures.
The general rule is that bathroom ceiling height should be at least 84 inches in most parts of the room. Toilets (including bidets in really fancy houses) and sinks should have headroom clearance of at least 80 inches at a point 10 ½ inches in front of the fixture.
Toilets should have at least 15 inches clearance to side obstructions such as walls, tubs and showers. Measurement is from the center of the toilet. Toilets and sinks should have at least 21 inches (more in some jurisdictions) clearance in front. See Figure 3.
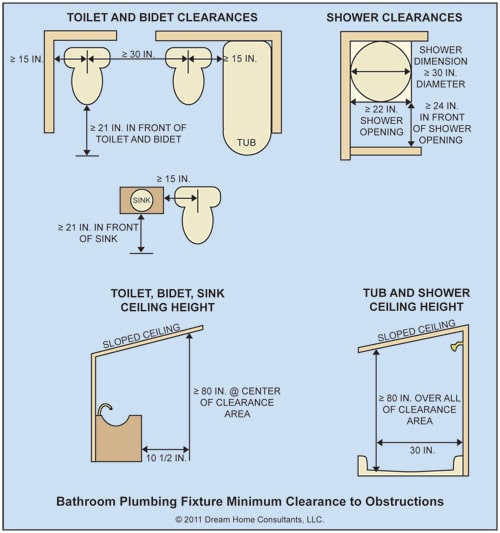
Figure 3
Showers and tubs are dangerous slip-and-fall hazard areas, so the minimum clearances are especially important. Showers and tubs with a shower head should have headroom clearance of at least 80 inches for a 30-by-30-inch area under the shower head. Shower floors should have a minimum area of 900 square inches, with a minimum dimension of 30 inches. A 25-inch minimum dimension is OK if the shower area is at least 1,300 square inches.
Showers should have at least 24 inches clearance in front of the opening and an opening that is at least 22 inches wide. Shower doors, if any, should slide or swing out. They may swing in, too, if they also swing out.
The bottom line
Homeowners and house flippers love to remodel bathrooms. Why not? Next to kitchen remodeling, bathrooms are one of the best bangs for the remodeling buck. Bathroom remodeling deficiencies, whether done through ignorance or carelessness, are quite common. Identifying and reporting these deficiencies is a good service to our clients.
Memo to the gods of remodeling: The Word does not reside on Mt. Olympus (just at its base) and welcomes other viewpoints. Send your lightning bolts or emails to Bruce@DreamHomeConsultants.com. The thoughts contained herein are those of The Word. They are not ASHI standards or policies.
To Read the Full Article
ASHI offers its members unparalleled resources to advance their careers. ASHI offers training for inspectors at all levels of knowledge and experience, including resources about all major home systems. Members benefit from a vast network of experienced professionals, providing a community for mentorship and knowledge sharing..
In this Issue

FIND A HOME
INSPECTOR
Professional Networking
Grow your professional network, find a mentor, network with the best, and best part of the community that’s making home inspection better every day.
